


When starting down the smart home path, I thought tracking building performance would be one of the more fascinating aspects. After all, having a better understanding of the home’s weakness’ can lead to better insights for future improvements. And while it may take a year to gather a full dataset, there really shouldn’t be any reason why that data couldn’t be put to work right now. So I set about testing some ideas, and the following is where I ended up.
Given the present state of my home, I’m not too keen to make any radical changes to its physical structure. So instead, I looked towards existing features like doors and windows. As manually operable items in the home, doors and windows help with regulating the internal comfort levels. But on their own, they are not smart. They have no way to comprehend when to be opened or closed. My goal, to change that through leveraging building performance data.
In this case, my existing home automation hub is performing the heavy lifting. Based on some simple temperature rules it advises the occupants which doors and windows to open and close, and most importantly, when. By optimising this process, the system can notify the occupants of the smallest environmental changes, that we as humans are unable to detect. My prediction here is that the temperature fluctuations throughout the home can be smoothed out. Hopefully, the house will remain warmer for longer in winter and cool down quicker in summer.
Sensors
At the heart of capturing performance data are sensors. For this system, they come in two forms, physical and template. Physical sensors are the actual devices collecting the data. Template sensors are additional virtual entities (sensors) within the system that converts the physical data it into new data.
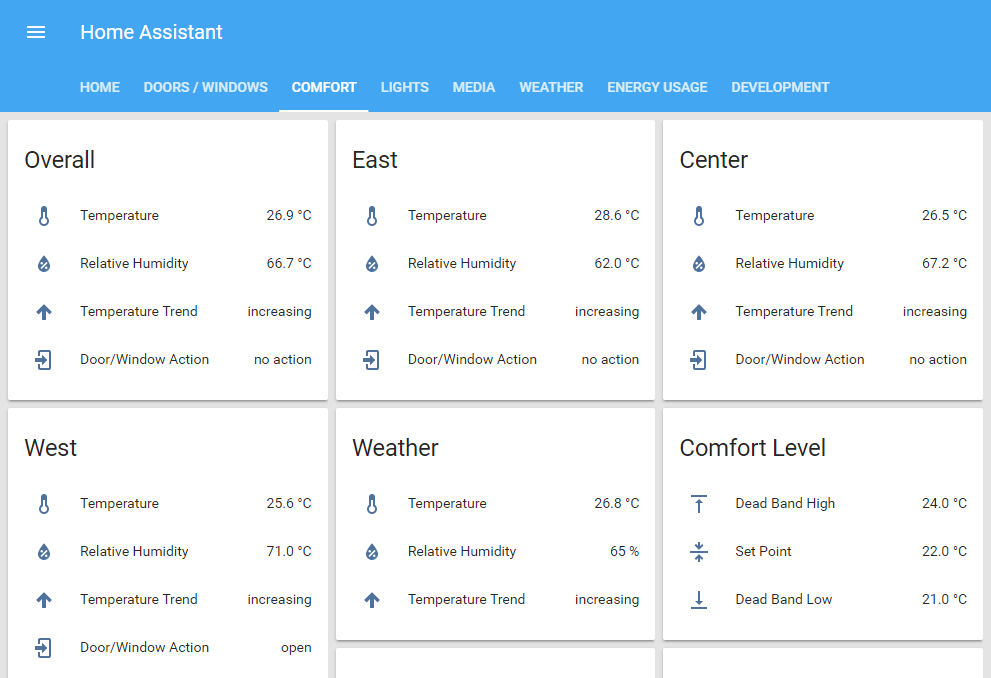
In this first step, we can see the physical sensor (sensor.temperature_158d00012d9624) does not have a friendly name. So we take that sensor’s temperature attribute and use it to create a new templated sensor (temperature_living). This sensor name becomes more easily recognisable for use elsewhere in the system.
temperature_living:
  friendly_name: 'Temperature'
  icon_template: mdi:thermometer
  value_template: '{{ states.sensor.temperature_158d00012d9624.state | round(1) }}'
  unit_of_measurement: '°C'
  entity_id: sensor.temperature_158d00012d9624
The house is divided into three distinct zones of east, center, and west. Each zone spans a few connected rooms, and in some cases as open-plan spaces.
In the following step, we create a new template sensor which calculates the mean temperature of all rooms within a zone. In this case for the center.
temperature_center:
  friendly_name: 'Temperature'
  icon_template: mdi:thermometer
  value_template: '{{ ((float(states.sensor.temperature_living.state) + float(states.sensor.temperature_kitchen.state) + float(states.sensor.temperature_media.state) + float(states.sensor.temperature_bed_3.state) + float(states.sensor.temperature_bed_4.state)) / 5) | round(1) }}'
  unit_of_measurement: '°C'
  entity_id:
    - sensor.temperature_living
    - sensor.temperature_kitchen
    - sensor.temperature_media
    - sensor.temperature_bed_3
    - sensor.temperature_bed_4
While not critical to the operations, I also wanted to track whether the temperature was decreasing or increasing. Home Assistant provides a useful Trend template sensor for this. Firstly it needs two template sensors, one for decreasing and a second for increasing.
temperature_trend_living_decreasing:
  entity_id: sensor.temperature_living
  invert: true
temperature_trend_living_increasing:
  entity_id: sensor.temperature_living
This trend data then passes through another template sensor to provide customised human-readable values of decreasing, increasing and no change. This template also supports customisation of the sensor icon.
temperature_trend_living:
  friendly_name: 'Temperature Trend'
  value_template: >-
    {%- if is_state("binary_sensor.temperature_trend_living_decreasing", "on") -%}
    decreasing
    {%- elif is_state("binary_sensor.temperature_trend_living_increasing", "on") -%}
    increasing
    {%- else -%}
    no change
    {%- endif %}
  icon_template: >-
    {%- if is_state("binary_sensor.temperature_trend_living_decreasing", "on") -%}
    mdi:arrow-down-thick
    {%- elif is_state("binary_sensor.temperature_trend_living_increasing", "on") -%}
    mdi:arrow-up-thick
    {%- else -%}
    mdi:window-minimize
    {%- endif %}
  entity_id:
    - binary_sensor.temperature_trend_living_decreasing
    - binary_sensor.temperature_trend_living_increasing
The states of the door and window openings in each room also need to be tracked. Refer to this previous part for some more details on using openings.
For an opening template sensor we capture the physical sensor state value, and then convert its False or True data into a closed or open value. It might look a little confusing here because the resulting values are False or True, but this is converted into closed or open using the device_class: opening line.
door_living:
  friendly_name: 'Living Door'
  device_class: opening
  value_template: >-
    {%- if is_state("binary_sensor.door_window_sensor_158d0001a1ecac", "off") -%}
    False
    {%- else -%}
    True
    {%- endif %}
  entity_id: binary_sensor.door_window_sensor_158d0001a1ecac
Comfort level
For Home Assistant to understand when to trigger a comfort level event, it needs some bounds put on the operating range. In the following, the comfort level Set Point is defined based on the time of the year. A lower temperature in winter, and higher in summer. Then the Dead Band High and Low are calculated relative to the Set Point.
temperature_set_point:
  friendly_name: 'Set Point'
  icon_template: mdi:format-align-middle
  value_template: >-
  {%- if states.sensor.date_month.state == 'January' -%} 23.5
  {%- elif states.sensor.date_month.state == 'February' -%} 24.0
  {%- elif states.sensor.date_month.state == 'March' -%} 23.5
  {%- elif states.sensor.date_month.state == 'April' -%} 23.0
  {%- elif states.sensor.date_month.state == 'May' -%} 22.5
  {%- elif states.sensor.date_month.state == 'June' -%} 22.0
  {%- elif states.sensor.date_month.state == 'July' -%} 21.5
  {%- elif states.sensor.date_month.state == 'August' -%} 21.0
  {%- elif states.sensor.date_month.state == 'September' -%} 21.5
  {%- elif states.sensor.date_month.state == 'October' -%} 22.0
  {%- elif states.sensor.date_month.state == 'November' -%} 22.5
  {%- elif states.sensor.date_month.state == 'December' -%} 23.0
  {%- endif -%}
  unit_of_measurement: '°C'
  entity_id: sensor.date_month

temperature_dead_band_high:
  friendly_name: 'Dead Band High'
  icon_template: mdi:format-vertical-align-top
  value_template: '{{ (float(states.sensor.temperature_set_point.state) + 2.0) | round(1) }}'
  unit_of_measurement: '°C'
  entity_id: sensor.temperature_set_point

temperature_dead_band_low:
  friendly_name: 'Dead Band Low'
  icon_template: mdi:format-vertical-align-bottom
  value_template: '{{ (float(states.sensor.temperature_set_point.state) - 1.0) | round(1) }}'
  unit_of_measurement: '°C'
  entity_id: sensor.temperature_set_point
The last template sensor defines whether a zone in the house should be opened or closed. This sensor considers numerous factors in the calculation; room temperatures, room openings, external weather, and the defined comfort levels.
The general rules for each state are, if:
Open
- Check if all openings are closed,
- and the center zone temperature is greater than the Dead Band High,
- or the center zone temperature is less than the Set Point and the outside temperature is greater than the Dead Band High.
Close
- Check if all openings are open,
- and the center zone temperature is less than the Dead Band High and the outside temperature is less than the Dead Band Low.
No Action
- Results when it’s neither open or close.
passive_openings_center:
  friendly_name: Door/Window Action
  icon_template: mdi:login
  value_template: >-
    {%- if
        states.binary_sensor.openings_living.state == 'off' and
        states.binary_sensor.openings_media.state == 'off' and
        (states.sensor.temperature_center.state|float > states.sensor.temperature_dead_band_high.state|float or
        (states.sensor.temperature_center.state|float < states.sensor.temperature_set_point.state|float and states.sensor.pws_temp_c.state|float > states.sensor.temperature_dead_band_high.state|float))
        -%}
    open
    {%- elif
        states.binary_sensor.openings_living.state == 'on' and
        states.binary_sensor.openings_media.state == 'on' and
        (states.sensor.temperature_center.state|float < states.sensor.temperature_dead_band_high.state|float and states.sensor.pws_temp_c.state|float < states.sensor.temperature_dead_band_low.state|float)
        -%}
    close
    {%- else -%}
    no action
    {%- endif -%}
  entity_id:
    - sensor.pws_temp_c
    - sensor.temperature_center
The virtual assistant
Finally, this is finished off through the automation. When either the open or close state for a zone is triggered, send a notification to the Google Home located in the center of the house.
The below example notification is for closing the center zone as the temperature decreases and when triggered during the day.
- action:
  - data:
      entity_id: media_player.living_room_home
      volume_level: 0.3
    service: media_player.volume_set
  - data:
      entity_id: media_player.living_room_home
      message: Close the center of the house.
    service: tts.google_say
  - data:
      entity_id: media_player.living_room_home
      volume_level: 0.5
    service: media_player.volume_set
  alias: Openings - Center - Close
  condition:
  - after: 08:00:00
    before: '20:00:00'
    condition: time
  trigger:
  - entity_id: sensor.passive_openings_center
    platform: state
    to: close


